

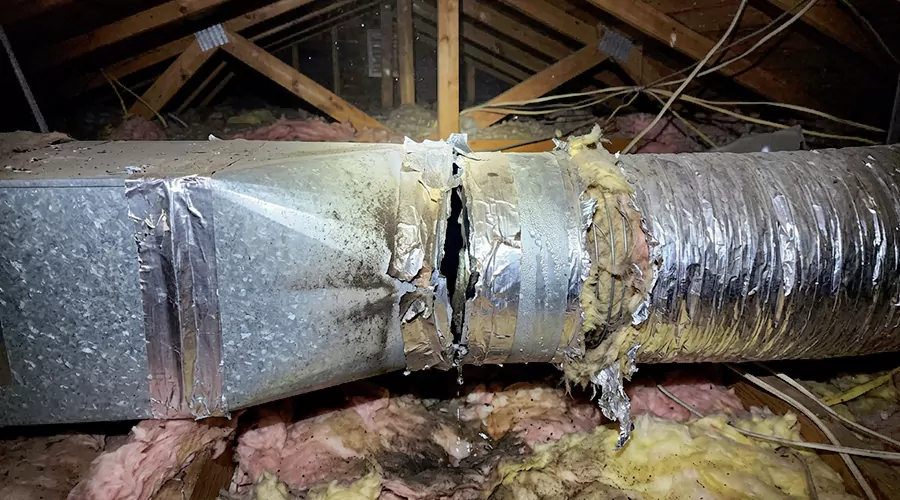
You can fix an AC duct leak by locating the damaged connection and sealing suitable openings with HVAC-rated mastic or approved metal-backed foil tape. Loose joints must be mechanically secured before sealing, while badly torn flexible ducts may require replacement. In 2026, professional duct leak repairs commonly cost $375 to $700 for many localized problems.
AC ducts deliver cooled air from the air handler to rooms throughout a home. When a supply duct leaks, some conditioned air escapes before reaching the intended outlet. Return-side leaks can create a different problem because they may pull hot or dusty air from attics and other unconditioned spaces into the system.
An AC duct leak is not the same as a refrigerant leak or a condensate water leak. Each affects a different part of the air conditioning system and requires a different repair. Identifying which problem is occurring prevents unnecessary work and helps restore normal cooling performance.
What Causes AC Ducts to Leak?
AC ducts develop air leaks when joints separate or the material becomes damaged. Improper installation and deteriorating sealing products are common causes. Flexible ducts may also tear or disconnect when they are moved or poorly supported. The correct repair depends on whether the problem is an unsealed joint or damaged duct material.
Loose Duct Connections
An air conditioning duct system contains multiple connections between trunks and smaller branches. These joints must remain mechanically secure so the blower can move air through the intended passage. When a fitting becomes loose, conditioned air can escape through the opening.
Some connections may not have been adequately sealed during installation. Others can separate after years of movement or maintenance activity near the duct. The resulting leak may be particularly noticeable when the affected branch runs through a hot attic.
A completely separated connection needs more than tape or sealant. The fitting must first be restored to its intended position and secured using an appropriate connection method.
Damaged Flexible Ductwork
Flexible ducts are commonly used to connect supply branches to ceiling or wall registers. They contain an inner air-carrying liner surrounded by insulation and an outer protective covering. When the inner liner tears or separates from its fitting, cooled air may escape into the surrounding space.
A damaged exterior jacket does not automatically mean the duct is leaking air. However, torn insulation can allow heat gain and condensation even when the inner liner remains intact. Identifying the affected layer helps determine whether sealing or replacement is necessary.
Failed Sealing Materials
Some duct joints rely on tape or sealant that has deteriorated over time. Ordinary cloth-backed duct tape is particularly unsuitable for long-term duct sealing because its adhesive can dry out and separate. Once the material loses adhesion, air can move through gaps along the joint.
Approved HVAC mastic and suitable foil tape are designed for duct sealing applications. However, even appropriate materials can fail when they are applied over dust or unstable connections. Proper surface preparation and mechanical attachment are necessary for a lasting repair.
Gaps Around AC Register Boots
A register boot connects a supply duct to the grille opening in the wall or ceiling. Gaps around the boot may allow cooled air to escape into the surrounding cavity instead of entering the room. The grille can look properly installed while the hidden connection remains poorly sealed.
These openings are sometimes easier to identify than leaks located deeper in the duct system. Removing an accessible vent cover may reveal gaps along the edges of the boot. The appropriate repair seals the connection without blocking the grille or changing the intended airflow direction.
Physical Damage During Renovations
Home improvement work can disturb duct sections installed in attics or concealed spaces. Workers may accidentally pull flexible ducts away from their fittings or place heavy objects on the material. Sharp tools can also puncture thin liners and create new leaks.
Sudden airflow changes following renovation work can provide a useful clue. However, weak cooling may have other causes, so the damaged section should be identified before repair. Inspecting safely accessible ductwork can help determine whether the work affected a connection.
How Can You Tell if Your AC Duct Is Leaking?
A leaking AC duct often causes reduced cooling in one or more rooms because conditioned air escapes before reaching the supply register. However, low airflow alone does not prove that a leak exists. Filters and closed dampers can produce similar symptoms, so the physical condition of the duct must also be considered. Our air duct camera inspection service can document conditions inside the duct system when visual inspection is not enough.
Supply duct leaks may release noticeable streams of cool air into attics or other surrounding spaces. Return duct leaks behave differently because the blower can draw unconditioned air inward. This distinction affects how the problem is located and what symptoms become noticeable.
| Symptom | Possible Cause | What to Check |
|---|---|---|
| One room receives weak cooling | Leaking or restricted supply branch | Register and accessible duct connection |
| Cool air escapes from an attic duct | Supply-side air leak | Damaged joint or torn liner |
| Increased dust after duct damage | Possible return-side leak | Return connections and filter housing |
| Several rooms receive weak airflow | Filter or equipment problem | Filter condition and blower operation |
| Whistling near a duct seam | Air moving through an opening | Connection and sealing material |
| Water around a cold duct | Condensation or building leak | Insulation and moisture source |
| Sudden change after attic work | Disturbed duct connection | Accessible flexible branches |
One important distinction is whether the problem affects only one room or the entire house. A disconnected supply branch often reduces airflow to one area. A filter restriction or blower problem may affect several outlets simultaneously.
What Are the Warning Signs of an AC Duct Leak?
AC duct leaks may remain hidden until comfort or system performance changes become noticeable. The symptoms depend on whether the affected opening releases conditioned air or draws unwanted air inward. Identifying the physical location of the leak is more reliable than assuming every cooling problem originates in the ducts.
Watch for these 10 warning signs:
- One room receives noticeably weaker cooling than similar rooms.
- Cool air can be felt escaping from an accessible duct connection.
- A flexible duct appears disconnected from its collar.
- Old sealing tape is peeling away from a duct seam.
- The outer duct covering shows damage near a connection.
- A visible gap appears between a register boot and surrounding material.
- Dust enters the return system through a damaged connection.
- Cooling performance changes after attic or renovation work.
- A whistling sound occurs near an exposed duct joint.
- Heating or cooling costs increase without an obvious change in use.
These signs do not measure how much air is being lost. A small opening can be difficult to detect by touch, while a large disconnected branch may release substantial conditioned air. The location and condition of the duct determine how the repair should be approached.
What Materials Do You Need to Fix an AC Duct Leak?
AC duct sealing requires materials intended for HVAC air distribution systems. The most common options are mastic sealant and approved metal-backed foil tape. Mechanical fasteners or clamps may also be necessary when a connection has separated. The correct products depend on the duct material and application.
HVAC Mastic Sealant
Mastic is a thick sealing compound used on compatible duct joints and seams. It can fill irregular openings where flat tape may be difficult to apply. The product must be suitable for the duct material and used within its approved gap limits.
Mastic does not replace mechanical support. A disconnected fitting must be secured before the sealant is applied. Wider gaps may require reinforcement according to the product instructions.
Approved Foil Tape
Metal-backed foil tape can seal compatible HVAC joints when applied to a properly prepared surface. It should be rated for the intended duct application and bonded firmly across the opening. Ordinary household duct tape is not recommended because it can deteriorate under normal HVAC operating conditions.
Some foil tapes are designed for specific duct materials or insulation coverings. A product suitable for sealing a rigid metal seam is not automatically appropriate for every flexible duct connection. The label should identify the intended use.
Mechanical Fasteners and Clamps
Disconnected duct sections require mechanical attachment before sealing. Rigid metal joints may use suitable sheet metal fasteners, while flexible duct collars commonly require approved clamps or straps. The purpose is to keep the air-carrying passage securely connected.
Incorrect fasteners can damage thin flexible liners or interfere with internal components. The connection method should follow the duct manufacturer's requirements. A stable fitting is the foundation of an airtight repair.
| Material | Main Purpose | Common Application |
|---|---|---|
| HVAC mastic | Seal joints and small gaps | Compatible rigid duct connections |
| Approved foil tape | Seal prepared seams | Suitable metal or other approved duct surfaces |
| Reinforcing mesh | Support sealant across wider gaps | Applications permitted by the mastic manufacturer |
| Mechanical fasteners | Secure connected sections | Rigid metal fittings |
| Approved clamps or straps | Secure flexible inner liners | Flexible duct collars |
| Duct insulation | Reduce heat transfer and condensation | Exterior of ducts in unconditioned spaces |
The materials should be selected after identifying the damaged component. Adding insulation over an unsealed air leak will not restore airtightness. Likewise, applying sealant over a torn or severely crushed flexible liner may not provide a reliable repair.
How to Fix a Small AC Duct Leak Step by Step?
A small air leak at a sound accessible joint may be repaired with appropriate HVAC sealing materials. The work should focus on restoring the existing connection without changing the duct's dimensions or airflow path. Larger openings and unstable fittings need additional mechanical repair before sealing.
Step 1. Turn Off the Air Conditioning System
Switch off the AC system at the thermostat and wait until the blower stops. This allows the damaged joint to be inspected without moving air affecting the work. Avoid opening electrical compartments or removing equipment panels unrelated to the duct connection.
Make sure the affected area is safely accessible. Attics can become dangerously hot and may contain unfinished surfaces that cannot support a person's weight. Repairs should not be attempted from unstable positions.
Step 2. Locate the Damaged Connection
Examine accessible duct joints for gaps or deteriorating seals. Look for a loose fitting or a separated flexible duct collar. Record the location and photograph the defect before making changes.
If the opening is hidden beneath insulation, avoid tearing the covering apart without understanding its construction. Some older insulation materials require special precautions. A visible gap is a useful starting point, but the surrounding material must also be evaluated.
Step 3. Check Whether the Joint Is Secure
Determine whether the affected connection remains mechanically stable. A narrow gap between sound metal sections may require only sealing. A loose fitting must first be properly reattached.
Do not depend on tape to support the weight of a disconnected duct branch. A fitting that continues moving can cause the new seal to separate. Restoring the mechanical connection prevents repeated leakage.
Step 4. Prepare the Duct Surface
Remove loose dust and deteriorating sealing material from the accessible exterior joint. The surface should be appropriate for the product being applied. Old adhesive and damaged coatings may prevent new tape or mastic from bonding properly.
Follow the manufacturer's preparation instructions and keep the area dry when required. Do not use aggressive tools that could damage the duct wall. Surface preparation should improve adhesion without weakening the connection.
Step 5. Apply the Sealing Material
Apply HVAC-rated mastic or suitable foil tape over the opening according to its instructions. The material should bridge the intended gap and bond securely to both sides of the connection. Wider openings may require reinforcement rather than unsupported layers of sealant.
Avoid covering dampers or other adjustable airflow components. A repaired connection must remain airtight while preserving the duct's intended passage. Sealant should not be applied inside equipment in a way that interferes with moving parts.
Step 6. Allow the Repair to Set
Follow the sealing product's required curing or drying period before returning the system to normal operation. The time depends on the product and the surrounding conditions. Do not assume every mastic is suitable for immediate exposure to operating airflow.
Inspect the repair after curing to confirm that the edges remain attached. A visible gap or loose section indicates that additional correction may be needed before startup.
Step 7. Test the Repaired Joint
Restore normal AC operation and observe the connection from a safe position. Air should no longer escape through a previously noticeable supply-side opening. The joint should also remain stable without excessive movement.
A household hand check can identify a large remaining leak but cannot measure total system leakage. Pressure testing provides more reliable verification when several connections have been repaired or hidden leaks remain suspected.
How Do You Fix an AC Leak in Flexible Ductwork?
Flexible duct repair depends on the condition of the inner air-carrying liner. A disconnected liner at a collar may be repairable by restoring the approved connection, while extensive tears often require section replacement. Simply wrapping the exterior jacket cannot correct an opening in the inner liner.
Repairing a Disconnected Flexible Duct
When the liner pulls away from a collar, the connection must be restored using the manufacturer's approved attachment method. The inner liner should be secured mechanically and sealed as required. Its surrounding insulation and outer jacket should then be returned to suitable condition.
The duct should also be properly supported after reconnection. Excessive sagging can place stress on the fitting and cause the liner to separate again. Correct support helps maintain a smooth airflow passage.
Repairing a Torn Inner Liner
A minor localized tear may be repairable when the duct manufacturer provides an approved method. However, a liner with extensive damage may not support a lasting patch. Severely torn material often requires replacement of the affected section.
A repair should not introduce sharp bends or reduce the duct's internal diameter. These conditions can restrict airflow even after the leak is sealed. The final connection must remain both airtight and properly shaped.
Restoring Damaged Insulation
After the air-carrying liner has been repaired, the surrounding insulation must be restored. Damaged insulation can allow cooled air to gain heat before it reaches the intended room. It can also increase the risk of condensation where humid air reaches cold surfaces.
Use insulation materials appropriate for the duct construction and installation conditions. The outer jacket should remain intact and properly sealed according to the manufacturer's requirements. Wet or contaminated insulation may need replacement rather than being enclosed beneath another covering.
How Do You Seal Leaks Around AC Vent Boots?
Register boots connect duct branches to supply or return openings in occupied rooms. Gaps between the boot and nearby drywall can allow air to move into concealed spaces instead of following the intended airflow path. These openings may be accessible after the grille is carefully removed.
Turn off the AC system before inspecting the register. Remove the cover only if it can be safely detached and reinstalled. Use a flashlight to examine the connection between the boot and surrounding building material.
Small suitable gaps may be sealed using a material compatible with the boot and wall or ceiling surface. The repair should follow product instructions and must not block the grille. Any loose mechanical connection between the boot and duct needs to be corrected separately.
After the seal is complete, reinstall the cover and confirm that its louvers operate normally. A register boot repair should reduce unwanted air movement without restricting the conditioned air entering the room.
What Is the Difference Between an AC Duct Leak and a Refrigerant Leak?
An AC duct leak involves conditioned air escaping from the ventilation system. A refrigerant leak occurs in the sealed cooling circuit and affects the equipment responsible for removing heat. These are separate systems and require different methods of diagnosis and repair.
A refrigerant leak may contribute to reduced cooling or ice forming on cooling components. Duct air leakage can also cause weak cooling in a room, but it does not mean refrigerant is escaping. Household duct mastic cannot repair a refrigerant line.
Condensate leaks create another type of problem because they involve water produced during cooling. An overflowing drain pan may wet insulation or nearby duct surfaces, making the problem appear related to ductwork. The actual drainage component must be repaired.
| Problem | What Is Leaking? | Appropriate Repair |
|---|---|---|
| Supply duct leak | Conditioned air | Secure and seal damaged duct connection |
| Return duct leak | Air moving inward through unintended gap | Seal return opening and correct connection |
| Refrigerant leak | Refrigerant from the cooling circuit | Qualified refrigeration diagnosis and repair |
| Condensate drain leak | Water produced during cooling | Repair drainage component |
| Condensation on a duct | Water forming from humid air | Restore insulation or control moisture |
| Disconnected duct | Large amount of conditioned air | Reconnect and seal affected section |
Understanding the difference prevents unnecessary work. A refrigerant problem cannot be corrected with air duct sealing, while cleaning the cooling coil does not restore a disconnected supply branch. The repair should match the actual source.
Can AC Duct Leaks Increase Energy Bills?
AC duct leaks can increase energy consumption when cooled air escapes into unconditioned spaces. The equipment may need to operate longer to maintain the desired room temperature. The actual effect depends on the size of the leak and where the escaping air goes.
ENERGY STAR estimates that typical homes lose approximately 20% to 30% of moving duct air through leaks or poorly connected sections. This figure describes duct air loss rather than a guaranteed increase in utility bills. Energy savings after repair depend on the system and the home's cooling demands.
Return-side leakage can also affect performance by drawing hot attic air or other unwanted air into the system. This may increase the cooling load and introduce particles that bypass the intended return path. Repairing those openings helps the system handle air from the appropriate spaces.
An air leak located entirely within conditioned space may have different energy consequences from one releasing cooled air into an attic. This distinction helps explain why the location of leakage matters as much as the size of the opening.
How Much Does It Cost to Fix an AC Duct Leak in 2026?
Professional duct leak repairs commonly cost $375 to $700 for many localized problems in the United States during 2026. An individual sealing repair may fall within a broader range of $150 to $500, depending on accessibility. Larger projects involving many joints or concealed damage can cost substantially more.
| Repair or Service | Estimated 2026 U.S. Cost |
|---|---|
| Sealing an individual duct leak | $150 to $500 |
| Localized duct leak repair | $375 to $700 |
| Professional duct leakage testing | $115 to $450 |
| Repairing damaged duct insulation | $200 to $800 |
| Whole-system professional duct sealing | $500 to $4,000 |
| Replacing a damaged duct section | $400 to $1,500 |
These figures describe different work scopes and should not automatically be added together. A whole-system sealing project may already include several localized repairs. Testing can be a separate service when the leak location remains uncertain.
Accessibility has a major influence on price. An exposed metal seam may be repaired more quickly than a damaged flexible branch concealed above a finished ceiling. The final estimate should identify the affected connections and explain whether sealing or replacement is proposed.
When Should You Call an HVAC Professional?
Professional repair is appropriate when the leak involves a disconnected branch or severely torn flexible ductwork. Hidden damage and persistent airflow problems also require evaluation because the leak may not be visible from accessible openings. A technician can determine whether sealing alone will restore proper operation.
A qualified HVAC technician can inspect duct connections and perform leakage testing when necessary. The assessment should identify whether the problem involves the supply or return side of the system. Measurements can also help determine whether airflow remains restricted after damaged sections are repaired.
Professional evaluation is important when extensive duct sealing could affect pressure conditions in a home with fuel-burning appliances. Changes in airflow can influence combustion venting under certain circumstances. Appropriate combustion safety checks help verify that equipment continues operating safely after significant modifications.
How Can You Prevent AC Duct Leaks From Returning?
Preventing recurring duct leaks requires secure mechanical connections and sealing materials suited to HVAC applications. Proper support reduces stress on flexible ducts, while regular inspection can reveal damaged joints before they separate completely. Protecting exposed sections from physical contact also helps maintain airtightness.
Inspect Accessible Duct Connections
Check visible ductwork during seasonal HVAC maintenance for loose fittings and peeling sealing materials. Pay particular attention to flexible duct collars because these connections can be disturbed during attic work. Document damage before it becomes extensive.
Use Appropriate HVAC Sealing Materials
Approved mastic and suitable foil tape provide better long-term sealing than ordinary cloth-backed duct tape. Follow the manufacturer's instructions for compatible surfaces and application conditions. A mechanically loose connection should always be secured before sealing.
Protect Flexible Ducts From Damage
Avoid placing heavy items on flexible ducts or pulling them during nearby maintenance work. Duct supports should prevent excessive sagging and sharp bends. Maintaining the correct shape helps prevent connection stress and airflow restriction.
Maintain Proper Duct Insulation
Inspect accessible supply ducts for damaged insulation or exposed cold surfaces. Suitable insulation helps reduce heat gain during cooling and limits condensation problems. Restore damaged vapor-retarding coverings according to the insulation system's installation requirements.
Monitor Changes in Cooling Performance
Pay attention when a room suddenly receives less conditioned air or becomes harder to cool. Check the filter and accessible registers before assuming a duct has started leaking. Early investigation may identify a loose connection before the duct separates completely.
Conclusion
Fixing an AC duct leak requires identifying the damaged connection and choosing a repair suitable for the duct material. Small openings can often be sealed with HVAC-rated products, while disconnected or severely torn sections may need more extensive work. The repair should restore airtightness without restricting airflow. Persistent problems may require professional testing. This week, inspect safely accessible AC ducts for gaps and damaged connections.